Introduction
Today, I had a chance to try out my new Twingate setup, and I noticed that my DNS wasn’t working. In this guide, I’ll show you how to set up Twingate to access your home network resources, including how to configure DNS using AdGuard Home on Home Assistant.
In the past, I used Pi-Hole (for ad blocking/DNS) and PiVPN (with WireGuard protocol), a Google domain, and Inadyn (DDNS client) for VPN. Everything was working great until Google decided to sell their DNS business to Squarespace (not a great move, Google). To make matters worse, Squarespace doesn’t support DDNS. I was already considering switching my DNS to something like Cloudflare, but then I saw NetworkChuck promoting Twingate and decided to give it a try. And I must say, I love it.
Twingate provides a modern zero-trust network access solution that’s perfect for securely accessing your home network resources from anywhere. Unlike traditional VPNs, Twingate offers device-level authentication, split-tunneling by default, and doesn’t require opening ports on your router or managing DDNS.
Update (January 2026): I discovered that running the Twingate Connector on the same host as your DNS server (AdGuard Home) can cause DNS resolution issues. If you experience problems, consider moving the connector to a separate machine. See my follow-up post: Fixing Twingate DNS Resolution with AdGuard Home.
Prerequisites
- A running Home Assistant instance on your local network
- AdGuard Home
- A Twingate account (free tier is sufficient)
- The Twingate Connector for Home Assistant (there are other options available as well)
Part 1: Setting up AdGuard Home DNS
Why Local DNS Matters
When accessing a resource like Home Assistant on your home network, you want to use a domain like *.homelab.internal. I ran into a snag with the recommended domain home.arpa for home networks, and it looks like I’m not alone in this, as mentioned on Reddit and on Medium. Therefore, I opted for a different domain, such as homelab.internal, which has been functioning seamlessly across all devices.
Setup AdGuard Home as DNS
Access your Home Assistant instance at Home Assistant’s default location http://homeassistant.local:8123.
Install the AdGuard Home Plugin from the Home Assistant Add-on Store. Enable the
watchdogoption (recommended) and optionallyshow in sidebar(very convenient). Start the plugin.Set Up Upstream DNS Servers
- Navigate to AdGuard Home Plugin and then in the top navigation to Settings → DNS Settings.
- In the
Upstream DNS serversform, add your upstream DNS provider. For example:
https://dns10.quad9.net/dns-query 9.9.9.9- Scroll down and press
Apply.
Look up your Home Assistant’s IP address
Set up your Router’s DNS Server
- Access your router’s settings.
- Find the DHCP or LAN settings.
- Enter the IP address of your Home Assistant instance into the DNS server field.
Add DNS Rewrite Rule
- Navigate to AdGuard Home Plugin and then in the top navigation to Filters → Custom filtering rules.
- In the
Custom filtering rulesform, add your hosts like you would in your/etc/hostsfile. See example below.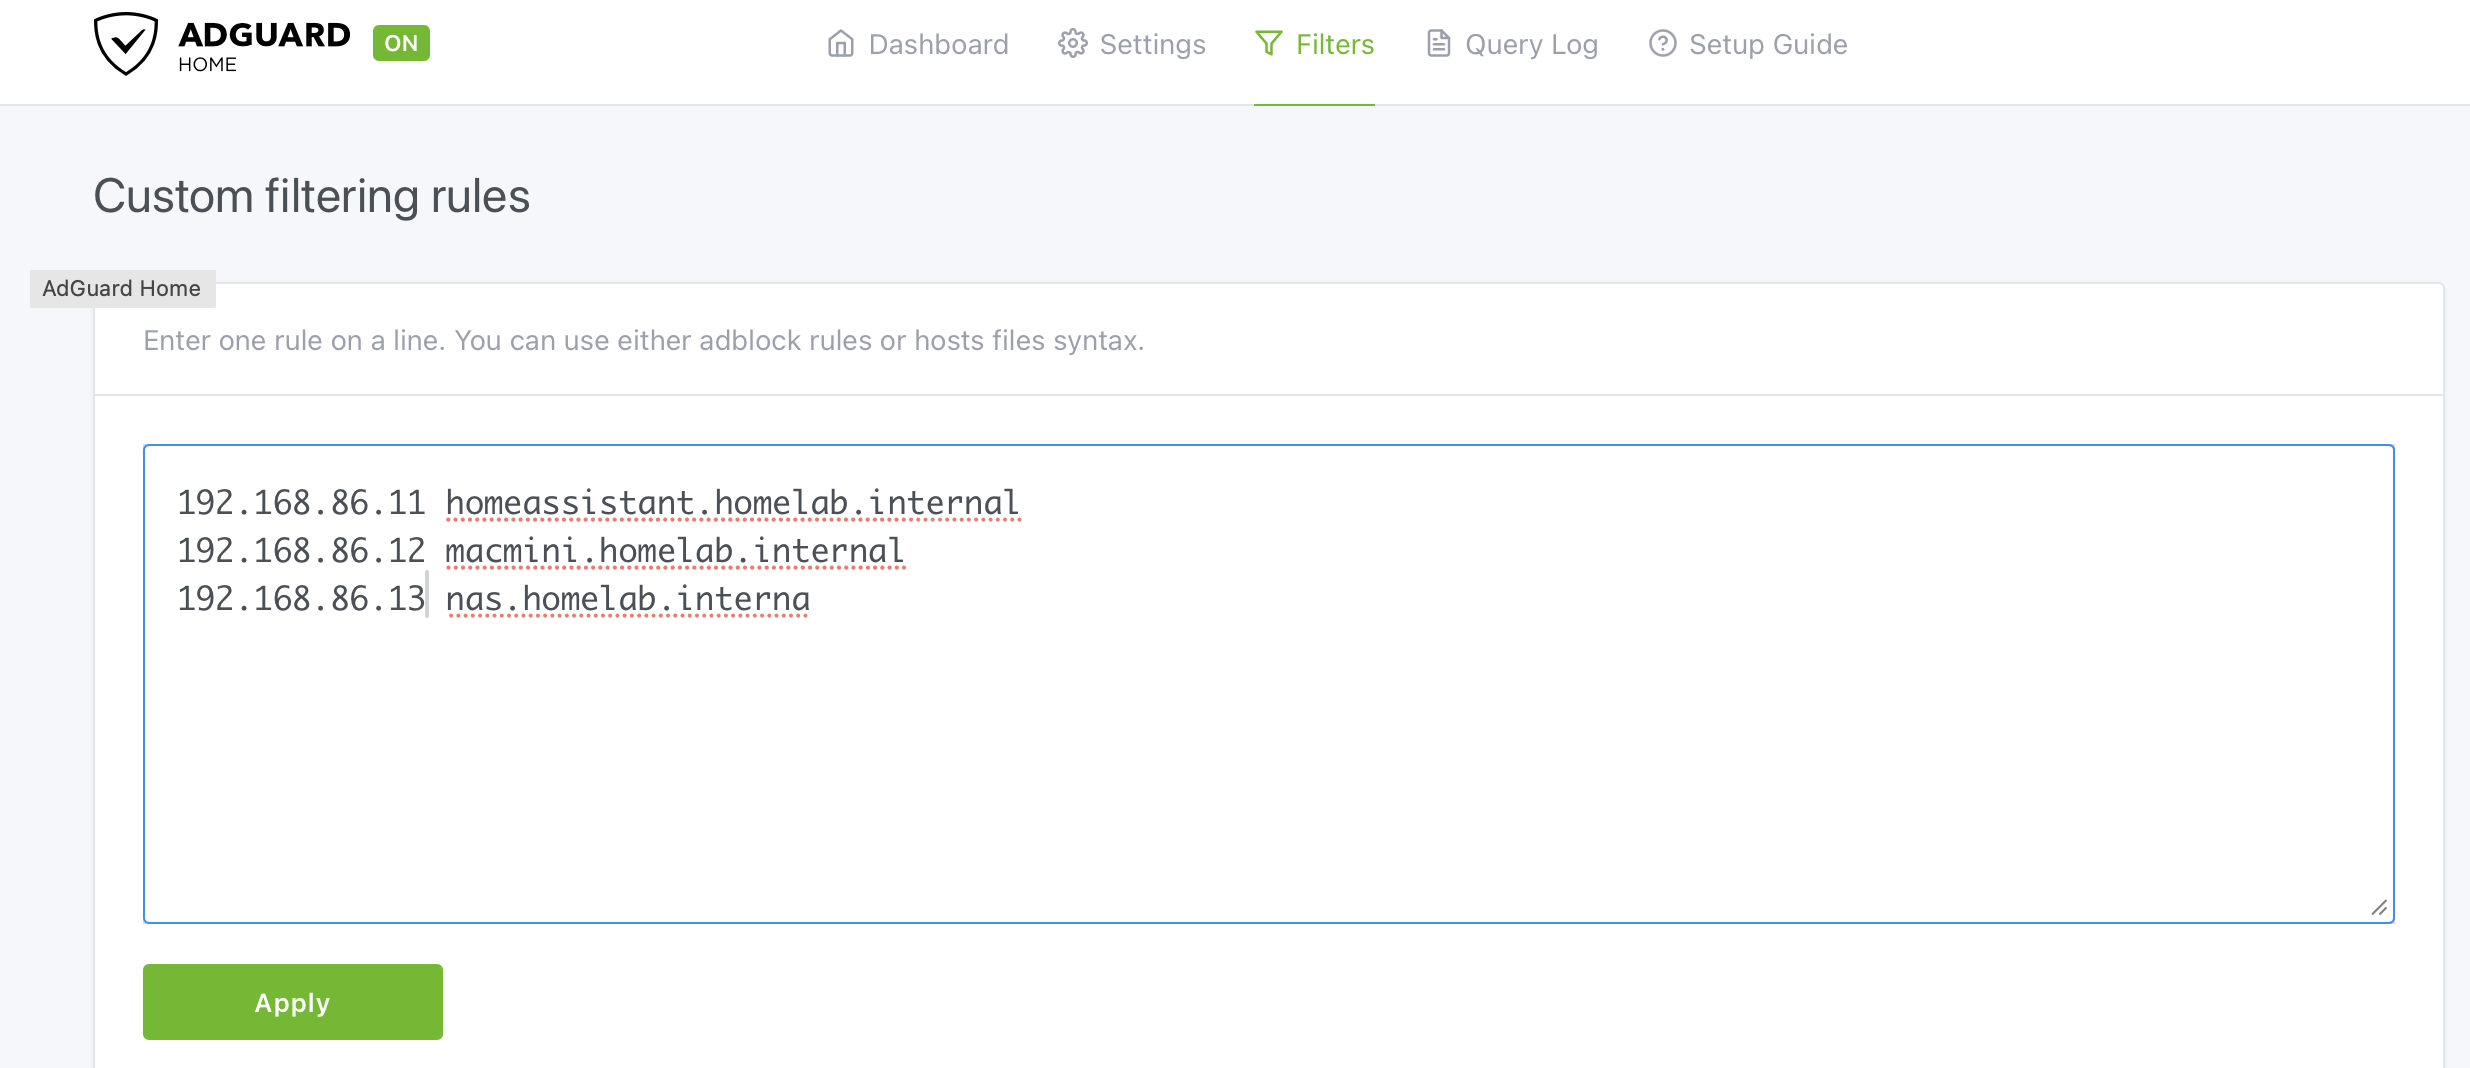
- Save the rule by pressing
Apply.
Verify DNS Resolution
# From a Mac/Linux device on your local network
nslookup homeassistant.homelab.internal
# Should return your Home Assistant IP
Part 2: Install Twingate Connector
The Twingate Connector is a lightweight service that runs on your network and provides secure access to your resources. Since you already have Home Assistant running, the easiest option is to install it on the Home Assistant instance from the Add-on Store by following the Twingate documentation.
Part 3: Configure Twingate Resources
Add Home Assistant as a Resource
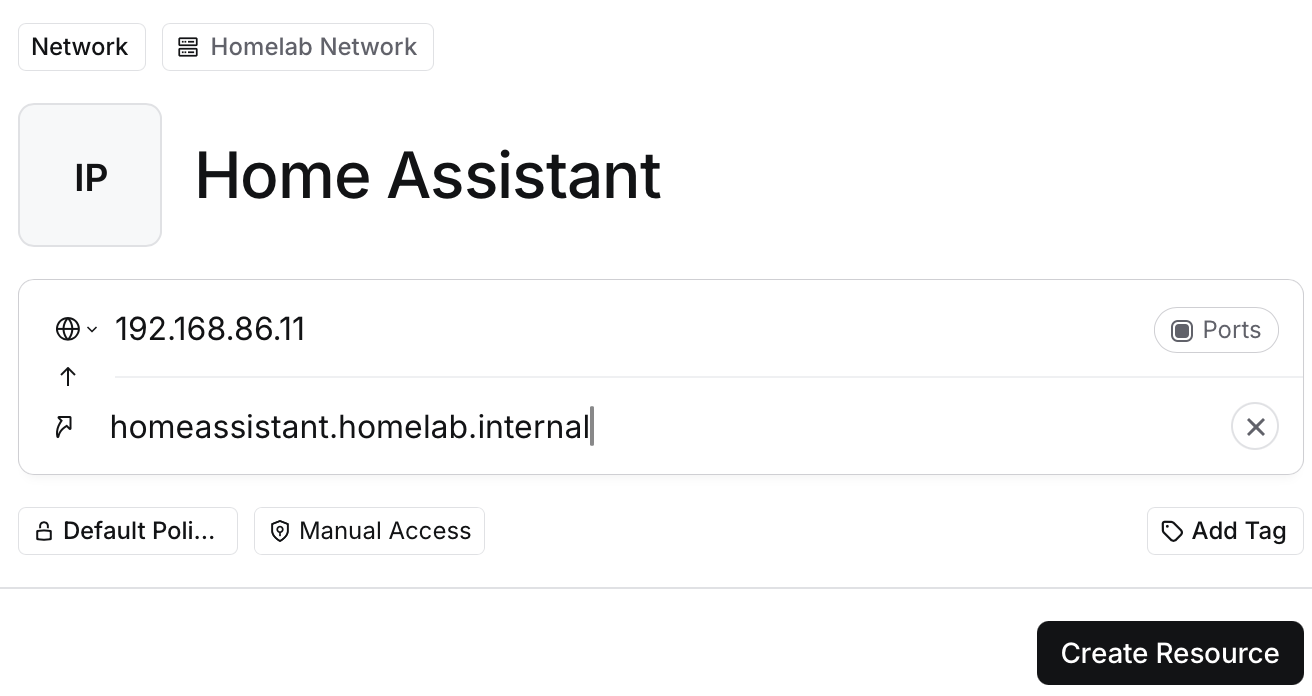
Navigate to Resources
- In Twingate Admin Console, go to Network → Resources
- Click Add Resource
Configure Resource Details
- Name: e.g.,
Home Assistant - Address: Use the same as previously used in the AdGuard configuration, e.g.,
homeassistant.homelab.internalor192.168.86.11, and useAliasto addhomeassistant.homelab.internalas the DNS name. - Optionally, you can also configure the port for your Home Assistant (or other service) if needed.
- Name: e.g.,
If you set up a custom policy, you can assign it to the resource.
Part 4: Client Setup
Install Twingate Client
Download the client for your platform:
- Windows/Mac/Linux: twingate.com/download
- iOS/Android: Search “Twingate” in app stores
Authenticate
- Enter your network name (e.g.,
homelab.twingate.com) - Complete SSO or email authentication
- Accept any required policies
- Enter your network name (e.g.,
Verify DNS Setup
# From a Mac/Linux device
nslookup homeassistant.homelab.internal
# Should return your Home Assistant IP
Conclusion
With this setup, you now have secure, zero-trust access to your home network without the hassle of port forwarding, DDNS, or maintaining WireGuard configurations. Compared to my previous Pi-Hole and PiVPN setup, Twingate offers several advantages:
- No exposed ports: Your router stays locked down with no inbound connections required.
- No DDNS dependency: No more worrying about domain registrars dropping DDNS support.
- Split tunneling by default: Only traffic to your home resources goes through the tunnel, keeping everything else fast.
- Easy device management: Add or revoke access from the Twingate Admin Console without touching your home network.
The combination of Twingate for secure access and AdGuard Home for local DNS gives you a modern, maintainable solution for accessing your homelab from anywhere.